Sunday, February 21, 2016

Lunch time reboot


Some how both kids are sleeping at 1:00 pm so I'm going to get this post up while eating this big bowl of yum: sauteed sausage, bell peppers, red onion, mushrooms and mustard greens.  Follow me on instagram if you want to see more of my eats!

At the beginning of this year, I decided I had missed blogging long enough and I would get back into it!  Not just get back into it, but making my own grown-up, self-hosted WordPress blog with its own legit domain name.  Then I started looking into things and watching tutorials and got intimidated.

Where did I think I was going to find the time to learn WordPress, customize a theme and start writing blogs again?  I need a week to hole myself up with coffee and fast internet.  Also a nanny.  Preferably a nanny who can teach my kids a foreign language and doesn't cost anything.  Oh, that's not gonna happen?  You don't say.

Instead I'm going to start with some baby steps.  I'll continue posting here.  Here is already set-up and pretty.  Maybe someday when my kids are grown I'll have time again.

My hat is off to all those parents who work full time from home with their babies.  You guys are working hard!  You do not get enough credit.

I'm going to take some time today and clean up this existing template.  I'll see you soon with more recipes, garden and family posts.  

How I Plan to Find Time for Big Goals

Growing or working on a local farm in exchange for all of my family's food is daunting.  Finding the time is going to take planning.  I don't want to deprive my kids of time and I still have responsibilities around the house - so much laundry!
I feed my family mostly from the produce and meat of a couple local farms which means I cook mainly from scratch for every meal.  I estimate at least three hours of every day is cooking and a couple hours are spent cleaning up from these meals.  And this is the least busy time of year, when I am benefiting from the labors of gardening and preserving and not doing them.
Considering this, I am going to try batch cooking to cut down on the amount of time I spend in the kitchen.  If I can cook and clean-up for multiple meals at once think how much time could be saved!  Why didn't I do this sooner?  Probably because I love cooking and being in the kitchen.
Post 2 Finding the Time for Project FoyJoy 1
My view this morning of my laptop with its keyboard protector.  It kind of ruins the slick look of my computer, but  I learned the hard way that an ounce of prevention of worth a pound of cure.
I even work on this website in the kitchen.  This is because Junebug is more likely to let me work in peace and entertain herself than when I am sitting on the sofa.  Perhaps I need a desk.
Which brings me to the first reboot recipe post.  Look forward to learning about meatballs.  The kind of meatballs toddlers and adults will eat with equal relish.  And the amazing tomato sauce I put up this summer to go with them.  And the ability to triple the batch and freeze them for future meals.
I am getting excited.  I think I will pull the meat out to defrost and go charge my camera battery.  

Defining My Goal to Grow or Work for the Food My Family Eats

Working out of our guest bedroom today because there is a desk in here.
I realize the sooner I have this conversation with myself the better.  You know the conversation where I define exactly what I need to do to be successful helping monetarily support my family while being a Stay at Home Mom.  Also, the meat I pulled out to make a triple batch of meatballs is still mostly frozen and thus I can't work on my recipe post.
Here's the big question:  How much do I need to add to my family's income?  No income isn't right because I want to grow/work for some of our food and that won't make money directly.  Perhaps savings? GDP? Net worth.  Net worth isn't quite right really because I need to look at yearly gain.  I'm going to call it Yearly Net Income. How much do I need to add to my family's yearly net income in the next year to validate working from home in the future?   
Next I should figure out what our family's yearly net income was for 2014.  Ugh this sounds like a tax question.  Luckily, we are an analytically inclined couple and in 2010 we started keeping track of our money on a website called Mint.  It takes a little work to set up, but then it sorts what you spend into categories automatically.  You can see where your money goes by asking Mint to show you graphs over time of various categories.
I feel weird about putting exact numbers up on the internet for all to see.  Money Taboos. Money Taboos. Money Taboos!  I am going to have to give some details since it is part of why I am writing this blog.  For now I'm going to show you in percentages.  That might be more useful anyways because cost of living varies and this way I can show you with less of that detritus in the way.
Ready?  Here's where my family spent our money last year (2014):
Post 3 Spending over the last year graph pie chart mint
The break down looks like this:
25% Home (mostly for our mortgage and a little for furnace repair)
18% Food and Dining
11% Bills and Utility (cell phones, internet, gas, and electricity)
10% Shopping (Target and Goodwill are in this category so it is mostly clothing and toiletries)
10% IRA savings
7% Auto and Transport (Gas and Insurance as we own both our cars.)
7% Health and Fitness (The birth of our baby and my husband's dental work cost about the same, interesting.)
4% Student Loan Payments
3% Travel
5% Other (including taxes, gifts, donations, and pets)
I looked at 2013 and it was very similar except we got back money from our taxes and instead of spending money on birthing a baby we spent it on a car.
Ideally, we would like to be paying off our house faster and putting more into retirement.  If we could, my spouse and I, would max out our IRA's at $10,000 and put what's leftover towards our house.  Once our house is paid off we could start looking at saving and traveling more.  That's a bit of dream right now.
As you can see our Food and Dining spending is our second biggest category next to our mortgage.
What I hope to find out this year is how much can I decrease what we spend on food by:
  1. Growing and preserving more myself
  2. Working in exchange for food
  3. Generating an income myself to off set the costs
  4. Reducing the amount we buy at traditional grocery stores like Kroger (8% of our income last year went to Kroger. That's 44% of all the money we spent on food.)
Thanks to Mint, I now know how much I need to off set our food budget.  It's a number so I'm not going to post it, just call it 18%.
Out of curiosity I am now calculating how much of a salary I would need to earn to offset these costs; factoring in childcare as that would become a necessity.  It isn't that much actually.  I could probably do it with a part time job.  Although I haven't tried looking for a job around here and I'm not sure what a base salary is like or if I could find anything that would pay me for my skill set and would feel like meaningful work. 
As it turns out to cover childcare, our food budget, plus an additional 10k to max out our IRAs I would have to earn about what I made before we moved here and started a family.  Oh man,  that is so doable!  I don't think there is anyway I could make that kind of income by working in exchange for food or doing work from home.  But since I am not going to be working this year anyways, I'm at least going to try and grow enough food or work in exchange to offset 18% of our 2014 net income.
Not a hopeful note to end this post on.  I know that if we follow the statuesque the best way to increase my family's income is for me to get a tradition salaried job and only garden as a hobby.  We could still buy our food locally.  But I want to explore the option that I could grow or earn our food.  So that's what I am going to do this year.  And that's real - really real.  

Batch Cooking Italian Meatballs for Multiple Meals - Recipe

Meatballs Recipe from FoyJoy.com
I promised you meatballs.  The kind of meatballs that kids and adults love equally. The kind that freeze well.  The kind that can be made as a quintuple batch.  Why would you want meatballs that were all of these things?  Because some days you want a tasty, quick toddler lunch or a fast family meal; because some days there are not enough hours in the day.
I am working on developing recipes that create multiple meals worth of food.  I have never understood folks who don't like leftovers.  Maybe they just don't have recipes that reheat well?  Then this recipe would be revolutionary - meatballs reheat well - for the record.
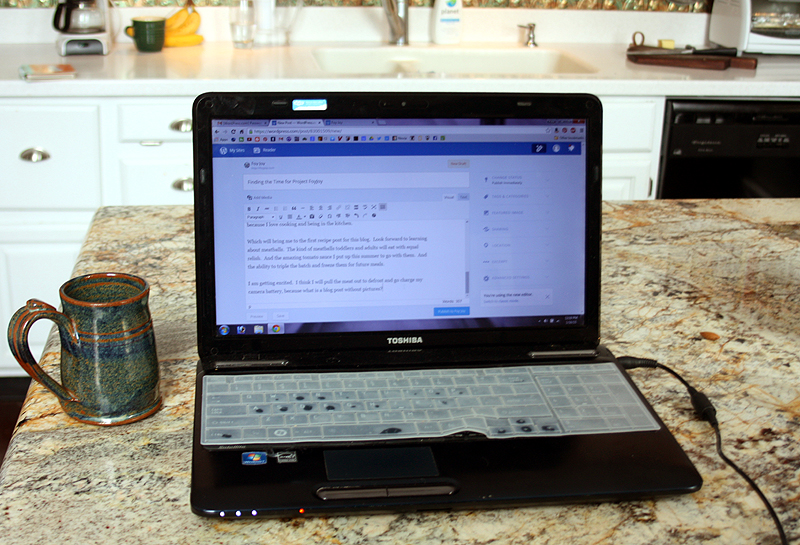
I love to cook and I would gladly make a homemade meal every night, but as I work on getting this blog up and running, and look into an expanding the vegetable garden, and possibly working in other people's gardens I realize having an arsenal of big batch recipes will be important to my peace of mind and the health of my family
Several nights this week I made big batch recipes and then didn't have to cook dinner the next day.  It was strange, but it was nice to do fewer dishes.  I'm not sure what I did with my extra time.  I do know I did not work on this website's design, sorry.
I tried a couple recipes that while they did make a quantity of food were nothing special and won't bare repeating.  I did make these meatballs.    This is one of my few recipes that I knew would scale and freeze well.  You should try it.  You will wash fewer dishes.  You will be thankful.
Meatball Recipe Page Cooks Illustrated
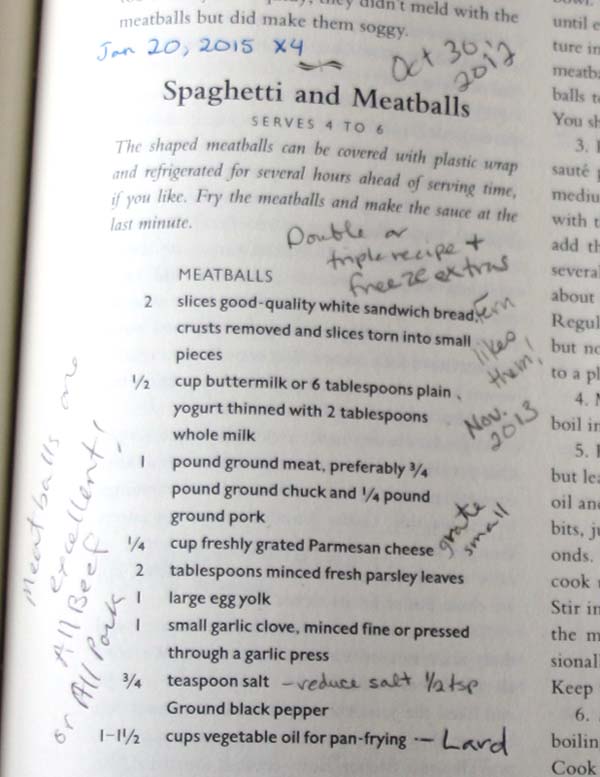
The recipe comes from my trusty Cook's Illustrated New Best Recipe (c)2004.
When I was going through my Grandma's recipes I loved her hand written notes, they gave a context to the recipes.  Since then I have started:
  • dating when I try a recipe,
  • any changes/additions and
  • if there were any special occasions or people who enjoyed the dish.
I highly encourage you to do the same.  I enjoy seeing my notes and find them useful;  And maybe future generations will too.
The first time I made this meatball recipe was three years ago, as you can see by my notes, after Jeff told me he preferred meatballs to meat sauce.  I think most people do, but meat sauce is just so frackin' easy.  Then I found a way to make meatballs just as easy, batch 'em!
There was a time when I could not get JuneBug to eat meat when she was about 12-18 months old.  She would only eat ground meat. I think it had something to do with meat being hard for her small jaw to chew. I found having meatballs in the freezer to be fantastic as quick toddler meals.
Now up until yesterday I had never done five pounds of meatballs in one go before, but I had tripled this recipe with great success before so I figured it would work.
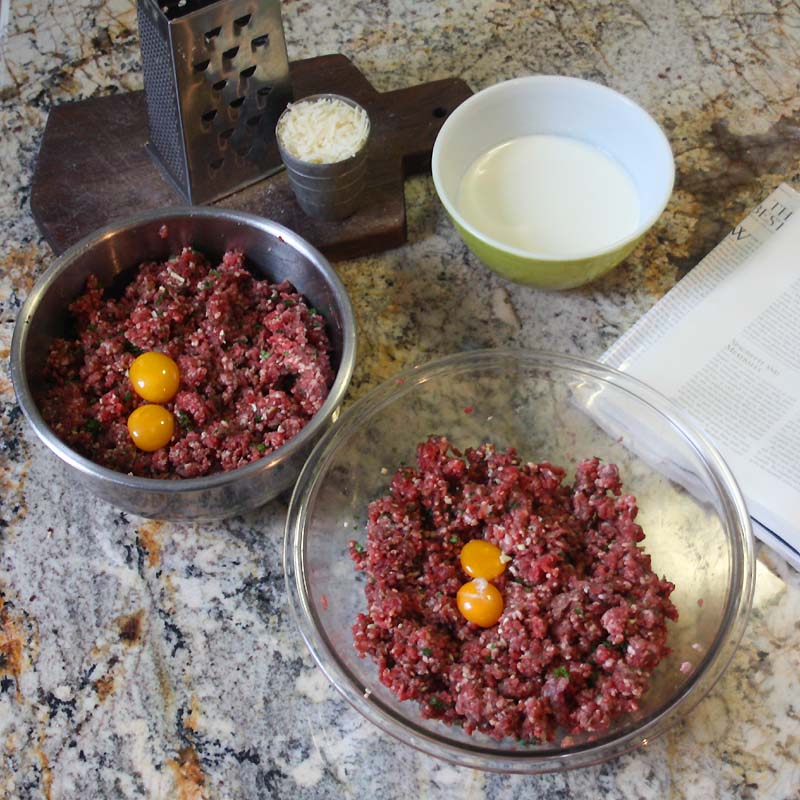
This is what a quintuple batch of meat mixture looks like:
Meat for the Meatballs 800
This is everything but the buttermilk and bread mixture.   I generally make all our bread.  That's another recipe that I should write up! It worked out fabulously since I we had fresh bread to make meatball sandwiches for dinner!
By the way, the mash of buttermilk and bread is called a panade and keeps the meatballs moist and tender.  This is especially important when you are using lean beef, like from a grass-fed cow.  How's that for a cooking tip?
Weighing Meatballs 800
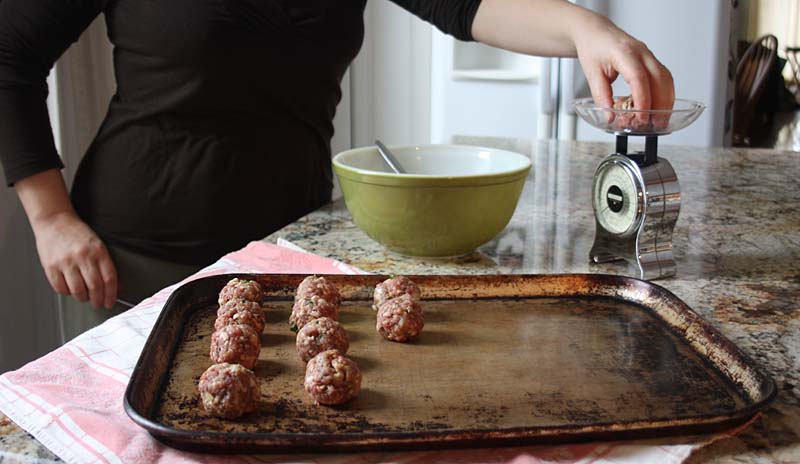
It is important to form meatballs that are all the same size so they cook evenly.  Is the scale over kill?  Maybe, but I am not good at eyeballing and this works for me.  I make small one-ounce sized meatballs.
Also, I have a remote camera shutter and now I can be in the photo too.  Nifty.
Check Temperature of Meatballs
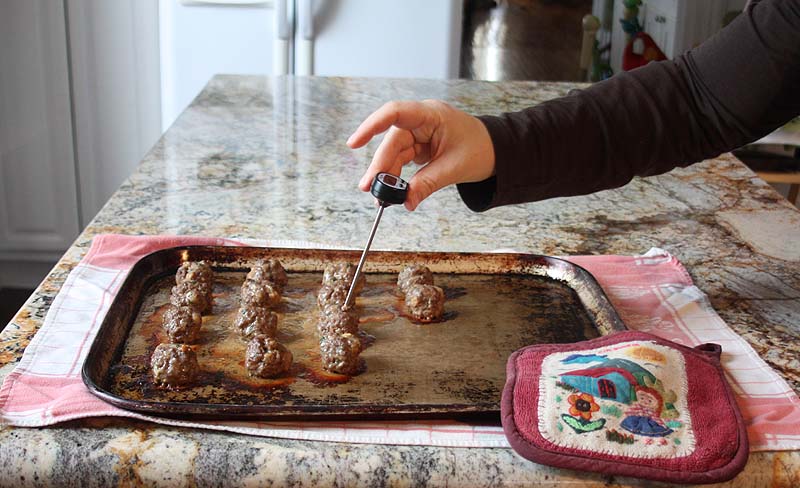
After the meatballs baked, I used a thermometer to check and make sure they are cooked to a safe temperature.  Ground meat should be cooked to 165 degrees F.
I do acknowledge that it is tastier to pan fry the meatballs.  However, pan frying 85 meatballs is not a time saving endeavor and I found it hard to get an even temperature on all the balls.  And since some of these are getting frozen, and the crunchy bits from the skillet that make pan fried superior wouldn't stay crunchy once frozen or refrigerated, I figure the oven is the way to go.  I looked up several recipes for baked meatballs to determine a temperature and cook time and with a few trials: 400 degrees for 12-15 minutes works out nicely.
After letting the seven dozen meatballs cool, I froze most and put some of them in the fridge.  They are ready and waiting for when I don't have time to cook.
This summer I put up some of my favorite Barbara Kingsolver's Family Secret Spaghetti Sauce.  It has tiny amount of lemon zest and cinnamon which give it a light fruity flavor that is a perfect compliment to salty, garlicky, tender meatballs.
Meatballs Frozen with Jar of Sauce
Future meals!  These are all the meatballs that were left after eating them for two dinners.  Hopefully, this is many lunches and another dinner.
Since some of you won't want to make a quintuple batch I wrote up the regular sized recipe and then included the big 5x batch in parentheses.  The instructions remain the same for both.
Italian Meatballs - Regular sized recipe (Big Batch) 
2 slices (10 slices) of sandwich bread torn into small pieces
1/2 cup (2 1/2 cups) buttermilk
1 pound (5 pounds) ground beef
1/4 pound (1 pound) ground pork
1/4 cup (1 1/4 cup) grated Parmesan cheese
2 tablespoons (10 tablespoons) minced fresh parsley leaves
1 large (5) egg yolk
1 (5) small garlic clove, minced
1/2 (2 1/2 teaspoons) teaspoon salt
1/4 (1 1/4 teaspoons) teaspoon ground black pepper
  1. Preheat your oven to 400 degrees F.
  2. Tear the bread into small pieces about the size of a penny or smaller. In a small bowl combine the torn bread and the butter milk.  Use a fork to mash it all together and make a thick paste.  Set aside.
  3. In a large bowl (or a very large bowl if making the quintuple batch) add the pork, beef, Parmesan, parsley, yolks, garlic salt and pepper.  Add the buttermilk paste and use your hands to mix it all together.  Then shape into 1-ounce balls, a kitchen scale makes it easy to keep the size consistent.  If you do not have a scale, aim for a touch smaller than a golf ball.
  4. Place the meat balls on a rimmed cookie sheet.  You can place them fairly close together as they won't expand while baking.
  5. Bake for 15 minutes.  Check to make sure they have reached 145 degrees, if not put them back in the oven and check again in 3-5 minutes.  You can also check by cutting a ball open and looking for any pinkness, you don't want any pinkness.  You want a well done ball.  If you can't get them all done in one go, put the meat mixture into a dish with a cover and refrigerate for up to two days.
Enjoy immediately with the pasta and sauce of your choice or as a meatball sandwich.  We've enjoyed these with basil pesto and tomato sauce.  The toddler likes hers plain because she is a toddler.
To freeze, wait until the meatballs are room temperature before packing and freezing.  If you want to make sure they don't become one lump, you can freeze them on a clean cookie sheet first and then transfer them into a bag.  They will last months sealed in the freezer.

The Cold Plate Test for Marmalade

A photo guide for how to do the cold Plate test for jams, jellies and marmalades from Foy Update

The cold plate test is a way for the home cook to check the consistency of jellied preserves during the cooking process.  

My next recipe is going to be how to make a gorgeous strawberry lemon marmalade.  I had never made a marmalade; and never made a jellied preserve without powdered pectin. All the recipes I came across were incomplete for a first time maker.  I did quite a bit of research to make sure I knew what I was doing. 

There were between 6-10 browser tabs open as I waded through each step.  In hopes of saving future makers all that work I am writing up very detailed steps, so if this is also your first time making marmalade or non-powdered pectin recipe, you'll have a clearer path.  Anyone can do it, if they have all the information!  

The marmalade recipe is coming up later this week.  First, here is how to do the cold plate test.  

To make sure the marmalade had jelled properly I used the Cold Plate Test - a way to test the texture of a preserve while it is cooking before it is cooled and jarred.   

To do the cold plate test:

    1. Place four clean china or Pyrex type plates in your freezer when you start cooking the preserve.  
    2. As your preserve darkens and the bubbles get gloppy, or it reaches 222-223 degrees F,   take a plate out of the freezer and drop a teaspoon of the hot marmalade on to the cold plate held flat.  
    3. Let it set 30 seconds then tip the plate.  The marmalade should run just bit and if you push your finger through it, it should wrinkle.  Hooray!  It's cooked perfectly and it's time to pour it into jars and process.    
    If it is Runny: If the marmalade runs off the plate there is still too much water in your mixture.   Let it cook for another 2-3 minutes then repeat step 3.    
    If it Doesn't Move: If the marmalade sets up hard, gets super tough and won't move at all, too much water has evaporated.  Add a quarter cup of water to your mixture and then repeat step 3.

    I documented what my marmalade looked like as I cooked it and the cold plate tests I did.  It took me three tests before my marmalade was ready to bottle.  


    How to do the Cold Plate Test for Jellies, Jams and Marmalades - a photo guide from Foy Update

    And I did indeed get a lovely spreadable texture for my marmalade.  

    How to do the cold plate test using this Strawberry Lemonade Marmalade as an example from Foy Update

    I love it when my recipes turn out just the way I was hoping.  


    Friday, February 12, 2016

    Strawberry Lemon Marmalade - All You'll Ever Need to Know About Making Marmalade Recipe

    Strawberry Lemon Marmalade - a shot of summer to get you through the cold winter

    Here is a lovely taste of spring when it seems like the snow is hanging on forever!  Sweet summer strawberries meet tart lemon juice and the slightly bitter zest in this Strawberry Lemon Marmalade.

    Last winter we hosted a friend who was on her way cross country.  Indiana was a nice way point.  She left a thank you jar of homemade ginger marmalade.  It was divine.  I didn't even try to convince  Junebug to try it again when she didn't like it because of the "sticks" in it.  More for me!
    Then summer came around and we found ourselves in the happy position of taking care of a neighbor's strawberry patch in the middle of the strawberry harvest.  We ate as much as we could hold and I froze three big bags of berries for winter jam making.  While looking up strawberry jam recipes I came across this one for Strawberry and Meyer Lemon Marmalade.  I pinned the recipe knowing I would have to wait until December to find organic citrus because that's when Florida and California are harvesting.

    Since the peel is used in marmalade and regular lemons are treated with fungicides and other chemicals to keep them looking good in the grocery store, I knew organic would taste better and be healthier.  
    December rolled around and it was busy so I figured I could put off marmalade making until January.  Then in January the grocers were constantly sold out of organic lemons.  Finally in February, I found a 2-pound bag, hallelujah!  Thank you California citrus growers.  It was jam making time.

    Lemon and Strawberries make a tart and sweet strawberry lemonade marmalade

    I went back and reread the recipe I had pinned only to realize I needed more information.  I wanted to know more about the time and temperature which thickened the marmalade; and how much peel to soak; and how to do the cold plate test to check to see if there is enough jell happening.

    First I tried my cookbooks and the only one I found a marmalade recipe in was my Ball Blue Book of Canning and it was a very brief recipe and did not answer any of my questions.  Next I did the internet search, hunting down marmalade recipes with lots of detail.  
    • This Williams Sonoma orange marmalade recipe told me more about the cold plate test.
    • This BBC Good Food orange marmalade recipe had even more information about the cold plate test as well how to know when the zest was cooked enough and descriptions of what the marmalade should look like as it cooks.
    • This Ina Garten's orange marmalade recipe included temperatures and what to do if the marmalade gets over cooked.
    • This Alton Brown's orange marmalade recipe said to use a candy or deep fry thermometer to reach the very specific 222-223 degrees F.  
    • And lastly I followed Love and Olive Oil's link to find the original recipe at Simple Bites which was a guest post by Food in Jars.  
    Then I set about making my strawberry lemon marmalade.  First thing you need to know is it takes two days.

    When making marmalade create a bundle of the seeds and rinds to soak in the juice.  This draws out the pectin that will help jell the preserves.

    Day 1:

    On day one zest the lemons and then juice them.  Then put the zest in the juice along with a bag full of any seeds and some of the leftover rinds.  You put them in a bag so you can take them out easily since they won't be in the final marmalade.  The soaking does two things:
    1. Softens the zest so the cook time is reduced
    2. Releases pectin from the rind and seeds so that a firm jell happens when you reach the magical 222-223 degrees F. 
    How to zest for marmalades - use a vegetable peeler and a paring knife to make ribbons rather than a micro-plane grater.
    The micro-plane grater (left) created too fine zest that did not produce the right consistency for traditional marmalade.  I found my vegetable peeler plus paring knife (right) allowed me to make nice small ribbons of zest.  If I had a zester tool I would have used that instead.  

    Also, on Day One macerate the strawberries by mixing them with half the sugar and let them sit covered overnight.  I learned from Sauver that macerating does some useful things:
    • The sugar breaks down the fruit so cooking takes less time,
    • The sugar draws the water out of the strawberries making a syrup,
    • The sugar makes the pectin stronger, and
    • The longer the fruit macerates the richer and stronger the flavors become
    If you want to do everything in one day, instead of letting the juice/zest and macerated strawberries sit overnight in the fridge you can do just three hours at room temperature.

    Macerated strawberries and lemon juice and zest create a sweet and tart marmalade

    Day 2:

    The next day make and bottle the marmalade.  First, take the bag of seeds and pith out of the lemon juice and discard them into the compost.

    Before cooking started here is the mixture of the strawberries, sugar, lemon juice and zest to make Strawberry Lemon Marmalade

    Then add, macerated strawberries, the remaining sugar, lemon juice and zest to a wide, heavy bottomed pot on the stove.  (A wide pot increases the surface area to speed evaporation and a heavy bottom heats evenly; in case you were wondering why that specific kind of pot.)

    Cook it all together until enough water evaporates, the color darkens and it reaches the magical 222-223 degrees F.

    The marmalade recipes I had open all suggested that it should only take 15-30 minutes to cook the marmalade.  Well it took me a little more than an hour.  I suspect it had something to do with the slow to heat nature of the enameled, cast-iron pot I used and the extra water in the strawberries.  Traditionally marmalade is just citrus fruit.

    As my marmalade cooked, I used the Cold Plate Test and a thermometer to check progress.  Once I had a nice jell, I bottled and processed the jars in a boiling-water canner.

    My only regret is that this recipe just makes four half-pints.  Here's how you can make it too: 

    Strawberry Marmalade AKA Strawberry Lemonade Jam

    1 pound of strawberries fresh or frozen 
    2 pounds of organic lemons (9 small or 5-6 large lemons)
    3 cups of sugar

     Day 1:

    1. Zest all the lemons.  You can either use a zester (not a micro-plane grater) to create small ribbons of zest.  Or use a vegetable peeler to shave off the top layer of rind and then use a sharp knife to cut the shaved peel into fine ribbons.  
    2.  Juice enough of the lemons to yield one cup.  Wrap any seeds and at least a third of the rinds into a small linen or cheese-cloth sack to create a bundle; preventing any of the rind or seeds from escaping.  
    3. In a large bowl add 1 cup lemon juice, zest, and 2 cups of water.  Then submerge the bundle with the seeds and rinds in the bowl.  Cover and let set at room temperature for 3 hours or overnight in the refrigerator.  
    4. In another large bowl, macerate the strawberries in 1 1/2 cups sugar.  Add the sugar to the strawberries and stir to coat.  Cover, then allow to set for the same amount of time as the lemon juice and zest.  You do not need to chop the strawberries, let the sugar do the work for you.  

    Day 2:

    1. Sanitize your canning jars and lids.  You will need 5 half-pints or the equivalent jars.  
    2. Heat a boiling-water canner to just about boiling and keep the water levels up while the marmalade cooks so you are ready to start canning when the marmalade is ready. 
    3. Take the bundle of seeds and rinds out of the lemon juice bowl and discard them (hopefully into your compost).  In a wide, large, heavy bottomed pot combine the lemon juice, zest, macerated strawberries, and the remaining 1 1/2 cups sugar.  
    4. Over medium heat bring the marmalade up to a simmer.  Reduce heat to maintain a gentle simmer. Stir every 5-10 minutes.  Once a simmer is reached cooking should take 40-60 minutes.  Use a thermometer to watch the temperature. As it approaches 222 degrees try the cold plate test to check the texture of your marmalade.  Also, visually the mixture will darken in color and the bubbles will become thicker and gloppier when the 222-223 degrees F is reached.  Here's what mine looked like when it was done cooking:
      Strawberry lemon marmalade cooked and ready to ladle into jars
    5. When you have the marmalade cooked, bring the water-bath canner up to a boil and fill the prepared jars leaving 1/4 inch head space, wipe the rims of the jars with a clean cloth before putting on the sanitized lids.  Then promptly process in the water-bath canner.  If you are using half-pints, process for 10 minutes at a boil.  
    6.  Remove the jars from the canner, let set on a towel over-night to completely cool.  Check the seals.  Any jars that have not sealed should be refrigerated and eaten in the next 3-4 weeks.  Store your sealed marmalade in a cool, dark, dry location.  
    Strawberry Lemon Marmalade Recipe at FoyUpdate.blogspot.com